How to Test Trunk Organizer Anchor Points for Failure: Step-by-Step Inspection and Reinforcement Guide
Introduction
This guide explains how to evaluate the anchor points of a trunk organizer to prevent sudden failure while driving. It describes visual inspection, load simulation, measurement techniques, and reinforcement methods. The reader will learn how to use inexpensive tools and professional‑grade organizers to achieve reliable results. Understanding anchor integrity protects cargo, passengers, and vehicle interior from damage.
What You'll Need
- Standard screwdriver set
- Torque wrench (optional but recommended)
- Measuring tape or ruler
- Weight plates or sandbags for load testing
- One or more trunk organizers to act as test loads (see recommendations below)
Step 1: Visual Inspection of Anchor Points
Begin by removing any loose items from the trunk and positioning the organizer in its intended location. Examine each anchor point, including built‑in hooks, Velcro strips, and strap attachment loops, for signs of wear, cracks, or loose stitching. Look for frayed edges on the 600D Oxford polyester material, which may indicate reduced load‑bearing capacity. For a reference model that demonstrates proper construction, consider the K KNODEL Medium Trunk Organizer. This organizer features reinforced handles, a non‑slip bottom, and a removable divider, making it an ideal benchmark for durability; it retails for $12.99 and holds a 4.7‑star rating from 13,187 reviewers.
During inspection, note any discoloration or water damage that could compromise the material. Verify that the reflective stripe is intact, as it provides night‑time visibility and indicates proper stitching alignment. Record each observation in a notebook, assigning a severity level from 1 (minor) to 5 (critical). A systematic record will guide later reinforcement decisions.
Step 2: Load Simulation Using a Standard Organizer
To assess anchor strength under realistic conditions, use a trunk organizer as a load‑bearing test object. The AOKJOY Collapsible Car Organizer is well suited because it is foldable, includes adjustable non‑slip shoulder straps, and is constructed from wear‑resistant 600D Oxford cloth. It costs $24.98 and enjoys a 4.8‑star rating from 2,928 reviewers.
Place the AOKJOY organizer in the trunk and fill each compartment with equal weight using sandbags or gym plates, targeting a total load of 30 kg (approximately 66 lb). Secure the organizer with its built‑in straps, then gently accelerate the vehicle to simulate normal driving forces. Observe whether any anchor points shift, stretch, or detach. If movement occurs, the anchor point is likely undersized for the intended cargo volume.
Repeat the test with the load distributed unevenly to mimic real‑world scenarios such as groceries on one side and tools on the other. Document any asymmetrical stress patterns, as they often reveal weak attachment loops or insufficient reinforcement.
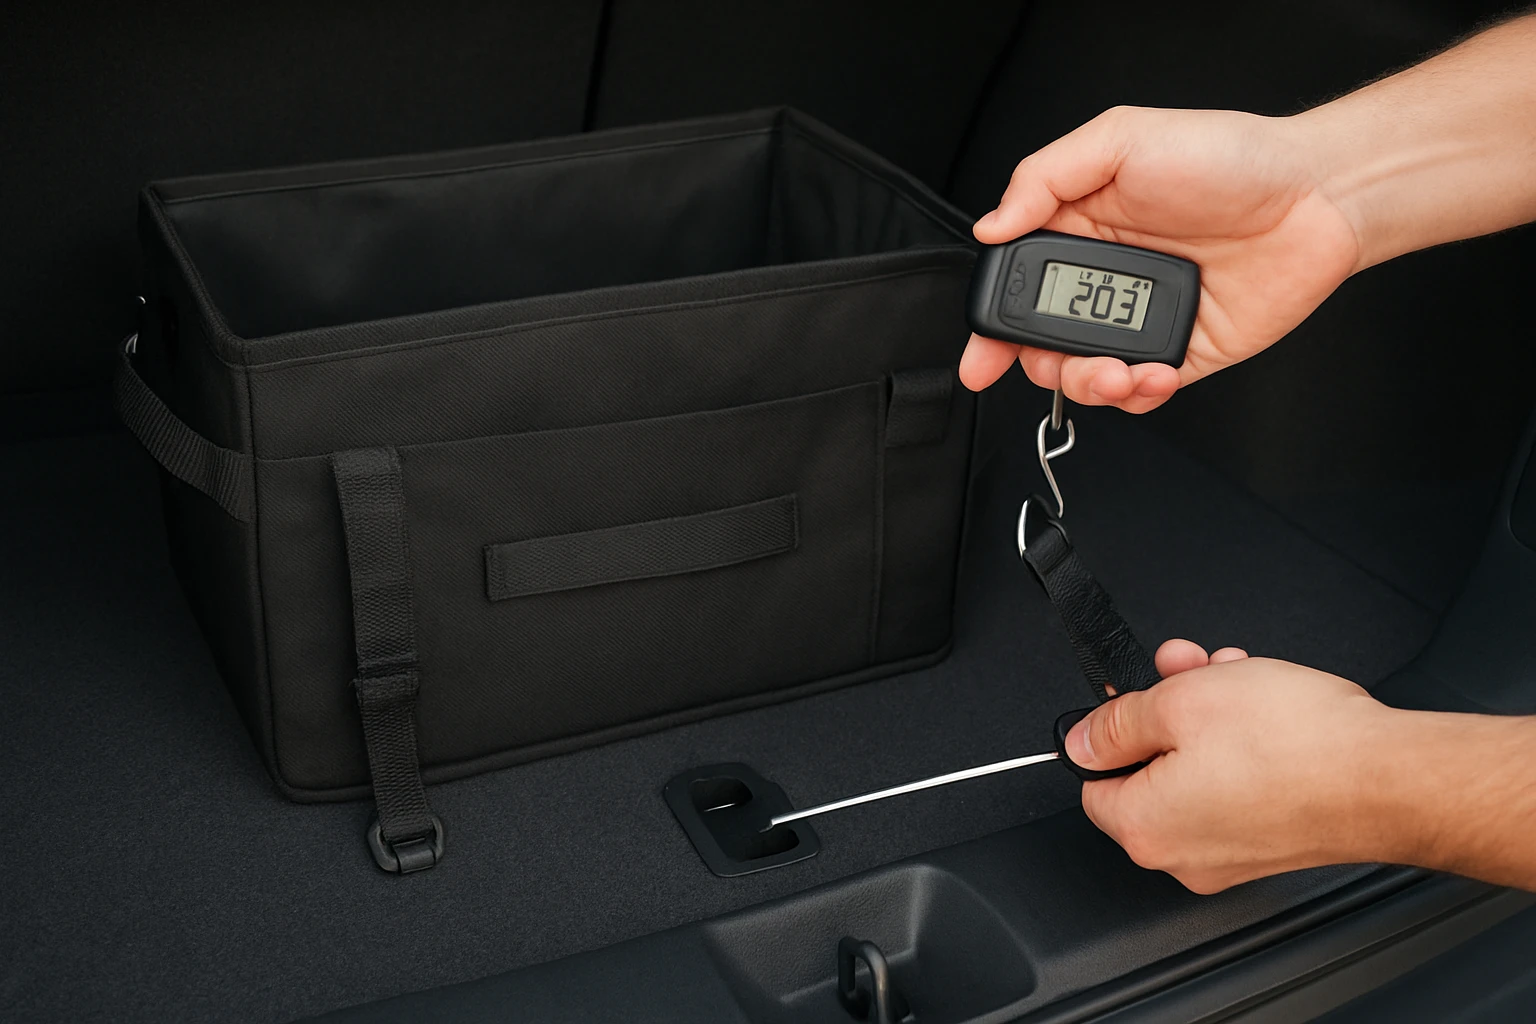
Step 3: Measuring Deflection and Stress
Accurate measurement of deflection provides quantitative data on anchor performance. Use a measuring tape to record the distance between the anchor point and the nearest fixed vehicle surface before loading. After applying the test load, measure the same distance again. The difference represents the deflection amount.
A larger deflection indicates that the anchor point may be yielding under stress. For a high‑capacity organizer that can accommodate larger test loads, the Femuar 72L Trunk Organizer is appropriate. It offers a 72‑liter capacity, waterproof 600D Oxford material, and Velcro non‑slip bottom, priced at $24.99 with a 4.7‑star rating from 5,080 reviewers.
Load the Femuar organizer with up to 45 kg (99 lb) to challenge the anchor points beyond typical everyday use. Record the initial and final measurements, then calculate the percentage change. A deflection under 2 % is generally acceptable for most passenger vehicles, while values exceeding 5 % suggest the need for reinforcement.
Step 4: Reinforcing Anchor Points with Additional Hardware
If any anchor point fails the visual or load tests, reinforce it with stronger materials. The HEYTRIP Trunk Organizer with Cooler includes built‑in 2 mm PE board panels, non‑slip pads, and two tie‑down straps that can be repurposed as reinforcement anchors. It is priced at $53.98 and holds a 4.7‑star rating from 3,615 reviewers.
Attach the HEYTRIP tie‑down straps to existing anchor loops using heavy‑duty buckles. The PE board panels distribute load across a larger surface area, reducing stress concentration on any single point. Tighten the straps with a torque wrench to 15–20 Nm to ensure a firm yet non‑damaging grip.
For vehicles with limited anchor hardware, consider adding supplemental brackets that bolt directly to the trunk floor. Use the organizer's non‑slip bottom as a base for the bracket, securing it with the organizer's existing straps. This hybrid approach combines the organizer's flexibility with the rigidity of a permanent bracket.
Step 5: Final Verification and Documentation
After reinforcement, repeat the load simulation using the same weight distribution as in Step 2. Verify that no anchor points move and that deflection remains within acceptable limits. Capture photos of each anchor point before and after reinforcement for visual comparison.
Complete a final checklist that includes: visual inspection status, load test results, measured deflection values, reinforcement actions taken, and any remaining concerns. Store this checklist in the vehicle’s maintenance folder for future reference.
For a versatile organizer that can serve both as a test tool and a daily storage solution, the FORTEM Foldable Trunk Organizer offers rigid base plates, non‑slip strips, and removable lids. It costs $27.99 and enjoys a 4.7‑star rating from 50,501 reviewers. Its sturdy construction makes it an excellent candidate for ongoing performance monitoring.
Tips & Pro Tips
- Perform the inspection in a well‑lit environment to detect subtle material flaws.
- Use a torque wrench rather than a manual screwdriver to achieve consistent strap tension.
- When testing with sandbags, seal the bags to prevent moisture from leaking onto the organizer.
- Consider installing a small LED work light in the trunk for nighttime inspections.
- Periodically re‑evaluate anchor points after major trips or after adding new cargo types.
Troubleshooting
- Problem: Anchor point slips despite reinforcement.
Solution: Replace the strap with a wider, high‑strength webbing and add a secondary buckle. - Problem: Non‑slip bottom becomes detached.
Solution: Re‑apply a high‑temperature adhesive designed for polyester fabrics. - Problem: Visible tearing after load test.
Solution: Upgrade to an organizer with reinforced stitching, such as the HEYTRIP model.
Conclusion
Testing trunk organizer anchor points involves systematic visual checks, realistic load simulations, precise deflection measurements, and targeted reinforcement. By following the steps outlined above, one can ensure that cargo remains secure and that the vehicle interior is protected from damage. The recommended organizers provide reliable benchmarks and versatile tools for both testing and everyday use. Regular inspection will extend the service life of the organizer and maintain safety on every journey.
Products Mentioned in This Guide
Frequently Asked Questions
What are the first steps for visually inspecting trunk organizer anchor points?
Remove all items, place the organizer where it will be used, and check hooks, Velcro, and straps for cracks, wear, or loose stitching.
Which tools are recommended for testing trunk organizer anchor strength?
A standard screwdriver set, measuring tape, weight plates or sandbags, and optionally a torque wrench for precise tightening.
How can I simulate real‑world load on a trunk organizer during testing?
Attach weight plates or sandbags to the organizer and gradually increase the load while monitoring for deformation or movement.
What signs indicate that an anchor point may fail soon?
Frayed edges, cracked polyester, loose stitching, or any visible damage to hooks and loops suggest impending failure.
How can I reinforce weak trunk organizer anchor points?
Use stronger straps, replace worn Velcro, add supplemental hooks, and tighten connections with a torque wrench to the manufacturer’s specifications.