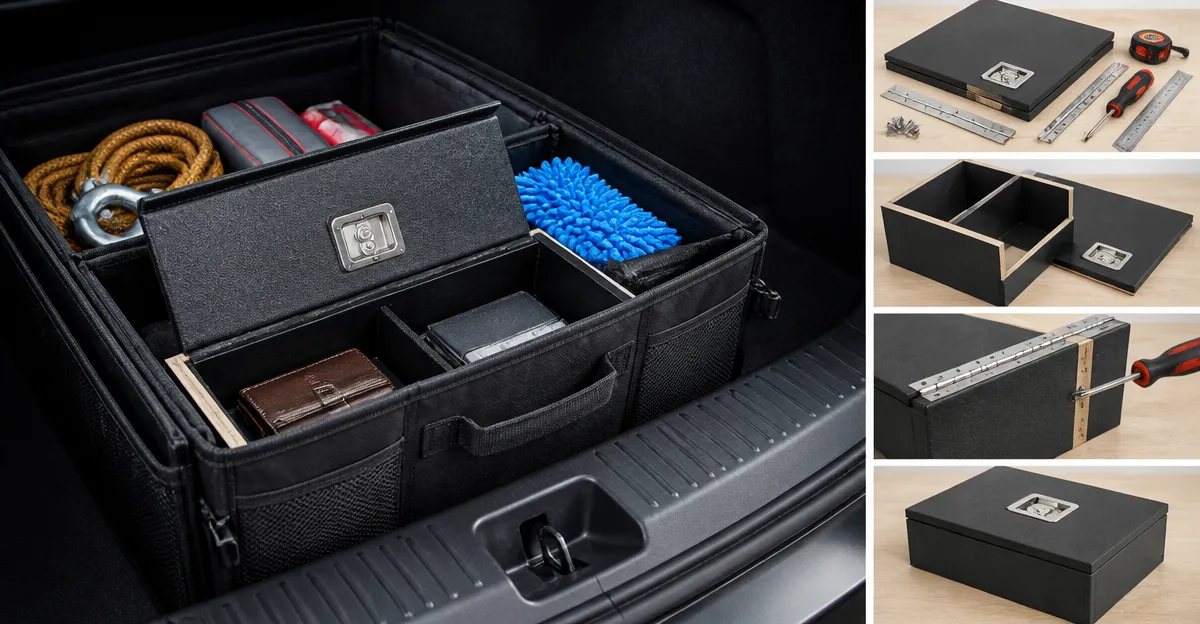
Introduction
In this guide one will learn how to transform a standard car trunk organizer into a fortified anti‑theft lockbox insert. The process combines simple modifications with a few purpose‑built products, allowing valuable items to remain out of sight and out of reach while the vehicle is in motion. By following each step, readers will gain a reusable solution that protects electronics, tools, or even small firearms without sacrificing cargo space. The result is a practical security upgrade that adds peace of mind on every journey.
What You’ll Need
- Lalifebuss Lock Box – 24 L capacity, dual 3‑digit combination lock, $32.39, 4.1★ (653 reviews)
- MIKKUPPA Trunk Organizer – 65 L collapsible organizer with straps, $25.99, 4.6★ (1,658 reviews)
- Plano Storage Trunk – impact‑resistant plastic trunk, $29.91, 4.6★ (21,247 reviews)
- Heavy‑duty Velcro strips (self‑adhesive)
- Measuring tape, marker, utility knife
- Optional: Dalmbox Handgun Lock Box for extra firearm protection, $21.69, 4.4★ (2,184 reviews)
Step 1: Assess Space and Plan the Layout
Begin by measuring the interior dimensions of the MIKKUPPA Trunk Organizer. The fully unfolded size is 22.8" L × 15.7" W × 11" H, providing ample room for a lockbox while leaving space for everyday items. Sketch a rough diagram indicating where the lockbox will sit, typically in the central compartment to balance weight and prevent shifting during sudden stops. Ensure that the chosen location does not obstruct the organizer’s adjustable straps, as these will later secure the lockbox in place. This planning stage avoids costly re‑work later in the process.
Step 2: Prepare the Lalifebuss Lock Box
Unbox the Lalifebuss Lock Box and set a unique three‑digit combination on both locks; the dual‑lock design ensures that the box cannot be opened unless both codes are entered correctly. Using the utility knife, trim any excess plastic from the top edge if the lock box height exceeds the organizer’s interior clearance. Apply a thin layer of silicone sealant around the lock box’s perimeter to reduce rattling when the vehicle accelerates. This preparation step enhances both security and acoustic discretion.
Step 3: Attach Velcro Strips for a Semi‑Permanent Fit
Cut two strips of heavy‑duty Velcro, each approximately 6 inches long. Affix one side of each strip to the interior walls of the MIKKUPPA Trunk Organizer where the lock box will rest, ensuring the surface is clean and dry for optimal adhesion. Press the matching Velcro side onto the lock box’s outer shell, aligning the strips so that the box snaps securely into place yet can be removed for cleaning. The Velcro provides a non‑permanent yet sturdy attachment, allowing the user to access the lockbox without tools while preventing movement during cornering.
Step 4: Secure the Assembly Inside a Plano Storage Trunk (Optional)
If additional concealment is desired, place the entire organizer‑plus‑lockbox assembly inside a Plano Storage Trunk. The trunk’s lockable lid and tie‑down points create a secondary barrier, deterring opportunistic thieves who might target the vehicle’s cargo area. Position the trunk in the vehicle’s cargo bay, using the built‑in tie‑down slots to anchor it to the vehicle’s frame or cargo rails. This double‑layered approach leverages the Plano trunk’s impact‑resistant construction and weather‑proof latches, making unauthorized access significantly more difficult.
Step 5: Integrate the Dalmbox Handgun Lock Box (If Needed)
For users who wish to store a compact firearm, the Dalmbox Handgun Lock Box can be nested inside the same organizer compartment alongside the Lalifebuss lock box. Set a personal combination on the Dalmbox, then position it beneath the larger lock box, securing both with the organizer’s adjustable straps. The steel cable included with the Dalmbox can be looped around the organizer’s internal frame for added theft deterrence. This configuration maintains compliance with California’s requirement for a metal storage container while preserving quick access when needed.
Step 6: Test Fit and Adjust
Close the organizer’s lid and gently shake the assembly to confirm that neither lock box slides or rattles excessively. If movement is detected, add additional Velcro strips or tighten the organizer’s straps until the components remain stable. Verify that the Plano trunk’s lid closes flush and that the lock mechanisms on both lock boxes operate smoothly after installation. Conduct a short test drive, listening for any unexpected noises that might indicate loose components. Adjust as necessary before relying on the system for long‑term use.
Tips & Pro Tips
- Label each combination code on a discreet piece of waterproof paper and store it inside the lock box for emergency reference.
- Apply a thin layer of rubberized spray coating to the exterior of the Lalifebuss Lock Box to further dampen sound and protect against minor scratches.
- Use the Plano trunk’s built‑in molded grooves to stack additional non‑essential items on top of the organizer, maximizing cargo space without compromising security.
- Rotate the combination codes periodically (every six months) to reduce the risk of code memorization by potential thieves.
- When storing firearms, always follow local regulations and ensure the lock box is secured with the steel cable to a fixed interior point.
Troubleshooting
Problem: The lock box rattles loudly during acceleration.
Solution: Add an extra layer of foam padding between the lock box and the organizer’s wall, or increase Velcro surface area to create a tighter seal.
Problem: The combination lock on the Lalifebuss Lock Box becomes difficult to turn.
Solution: Clean the lock mechanism with a small amount of silicone lubricant and rotate the dials several times to distribute the lubricant evenly.
Problem: The Plano trunk’s latch fails to stay closed when the vehicle is on a steep incline.
Solution: Install a small padlock on the latch using the four‑pad‑lock capability mentioned in the product description, providing an extra mechanical lock.
Conclusion
By following these steps one can create a robust anti‑theft lockbox insert that integrates seamlessly with a car trunk organizer. The combination of a dual‑lock Lalifebuss Lock Box, a versatile MIKKUPPA Trunk Organizer, and an optional Plano Storage Trunk yields a layered defense against theft. Users retain easy access to essential items while benefitting from the added security of lockable compartments and sturdy tie‑down points. Implementing the pro tips and troubleshooting advice ensures long‑term reliability, making this DIY solution a valuable addition to any vehicle’s cargo system.
Products Mentioned in This Guide
Frequently Asked Questions
Can I use any lockbox with a trunk organizer, or must I use the Lalifebuss Lock Box?
Any lockbox that fits the organizer’s dimensions and has a reliable lock will work, but the Lalifebuss model is recommended for its size and dual 3‑digit combination.
Will adding a lockbox reduce the usable space of my trunk organizer?
The lockbox occupies part of the organizer’s volume, but the remaining compartments stay functional, so cargo capacity is only slightly reduced.
Do I need special tools to install the anti‑theft lockbox insert?
No special tools are required; the installation uses the organizer’s built‑in straps and simple positioning of the lockbox.
Is the anti‑theft lockbox insert safe for storing small firearms?
Yes, the lockbox’s impact‑resistant plastic and secure combination lock make it suitable for small firearms when legal in your jurisdiction.
How can I improve the security of the lockbox beyond the combination lock?
Add a secondary lock, such as a cable lock through the organizer’s straps, or place the lockbox in a concealed spot within the trunk for extra deterrence.