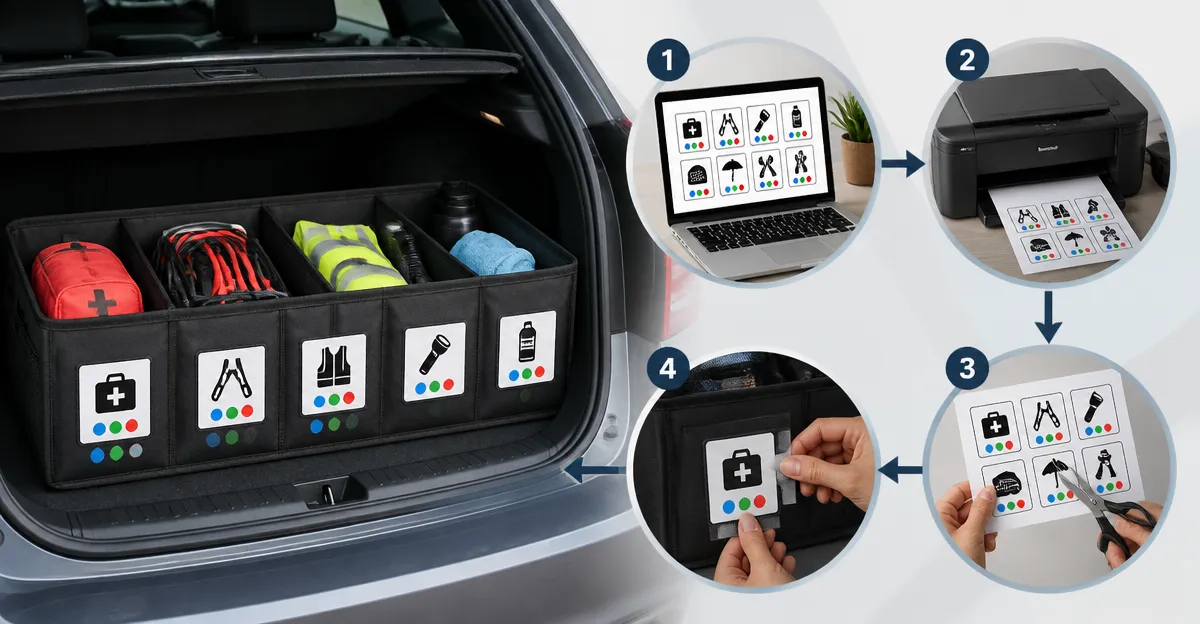
How to Create a Multilingual Icon Labeling System for Trunk Organizers — Step‑by‑Step Guide with Printable Labels
This guide explains how to design clear, multilingual icon labels and attach them to a trunk organizer so that every passenger can locate items quickly. Readers will learn to choose the right organizer, create printable labels, and secure them in a way that resists wear and movement. The process saves time, reduces clutter, and improves safety for families, travelers, and professionals who share a vehicle. By following each step, one can achieve a tidy trunk that works for speakers of any language.
What You’ll Need
- Computer with graphic design software (free options such as Canva or Inkscape are sufficient)
- Printer capable of high‑resolution color output
- Adhesive label sheets (matte or glossy, depending on preference)
- Scissors or a craft knife
- Velcro strips or double‑sided tape for removable attachment
- One of the recommended trunk organizers (first mention linked below)
Step 1: Assess Your Storage Zones
Begin by examining the interior of your chosen trunk organizer and noting the natural compartments. Identify zones for groceries, tools, emergency kits, and child supplies; each zone will receive its own icon label. Sketch a simple floor plan on paper, assigning a short descriptive word in each target language (e.g., English, Spanish, French). This planning stage ensures that the final label set matches the physical layout, preventing mismatched icons later.
Step 2: Choose a Trunk Organizer That Fits Your Vehicle
Selecting a sturdy, modular organizer simplifies label placement because the compartments remain stable during travel. The HOTOR Trunk Organizer offers two large compartments, six mesh pockets, and a 60 lb capacity, making it ideal for families and professionals alike. Its foldable design allows you to collapse the unit when not in use, preserving trunk space for larger cargo. With a 4.6‑star rating from over 9,500 reviewers, the organizer combines durability and flexibility at a price of $12.99.
Step 3: Design Multilingual Icon Labels
Open your design program and set the canvas size to match the dimensions of your label sheets (commonly 2 × 4 inches). Create a simple icon for each storage zone—use universally recognizable symbols such as a grocery bag, a wrench, a first‑aid cross, or a diaper. Below each icon, add the word for the zone in the languages you have selected, using a clear sans‑serif font no smaller than 12 pt. Export the design as a high‑resolution PDF to ensure crisp printing.
Step 4: Print and Cut the Labels
Load the adhesive label sheets into your printer and select the highest quality setting for color accuracy. Print a test page on plain paper first to verify alignment; adjust margins if necessary. After printing, use scissors or a craft knife to cut each label neatly along the guide lines. For extra durability, consider laminating the labels or selecting a glossy label stock that resists moisture.
Step 5: Attach Labels Securely
Attach Velcro strips to the back of each label and the corresponding compartment of the organizer. Velcro allows you to reposition labels if you rearrange items, and it prevents permanent damage to the organizer’s fabric. The HOTOR organizer’s reinforced stitching and thick base panel support the added weight of the labels without sagging. Press each label firmly into place, ensuring the icon faces outward for quick visual identification.
Step 6: Test the System in Real‑World Conditions
Load the trunk with typical items—groceries, tools, or baby supplies—and drive a short distance to observe any shifting. Verify that each label remains visible and that the organizer does not slide; the non‑slip base of the HOTOR unit, combined with Velcro, should keep everything stable. If any label detaches, add a small piece of double‑sided tape beneath the Velcro for extra grip. Adjust the label positions as needed to maintain a clean, organized appearance.
Step 7: Maintain and Update Your Labels
Periodically review the contents of each compartment and update the labels if your storage needs change. Because the labels are removable, you can redesign icons or add new languages without repurchasing the organizer. Keep a spare set of printed labels in the vehicle for emergencies or seasonal items such as ski gear or holiday decorations. Regular maintenance ensures the system remains effective for years.
Tips & Pro Tips
- Use high‑contrast colors for icons to improve readability in low‑light conditions.
- Choose waterproof label material if you frequently transport wet items like umbrellas or sports gear.
- For a more polished look, print on magnetic label sheets and attach magnets to the organizer’s metal frame (if applicable).
- Consider adding QR codes that link to a digital inventory list for advanced organization.
Troubleshooting
Labels slide off after a few trips. Reinforce the Velcro with a strip of non‑slip silicone tape, or replace Velcro with reusable adhesive putty.
Compartment dimensions do not match label size. Resize the label template in your design software to fit the exact dimensions of the compartment, then reprint.
Organizer collapses when fully loaded. Distribute weight evenly across both large compartments, and avoid overloading beyond the 60 lb rating of the HOTOR organizer.
Conclusion
By following this guide, one can create a multilingual icon labeling system that transforms any trunk organizer into a universally understandable storage hub. The process combines thoughtful planning, simple design tools, and a reliable organizer such as the HOTOR Trunk Organizer. Consistent use of clear icons and removable labels reduces clutter, saves time, and enhances safety for all vehicle occupants. Implement the system today and experience a more organized, stress‑free driving experience.
Products Mentioned in This Guide
Frequently Asked Questions
What supplies are required to create a multilingual icon labeling system for a trunk organizer?
You need a computer with graphic design software, a high‑resolution color printer, adhesive label sheets, scissors or a craft knife, and Velcro strips or double‑sided tape for attachment.
How do I choose the right icons for multilingual labels?
Select simple, universally recognizable symbols and pair each with short text in the target languages, keeping the design clear and legible.
Can I create printable labels without expensive software?
Yes, free tools like Canva or Inkscape let you design high‑resolution icons and export them as PDF or PNG for printing on label sheets.
What is the best method to attach labels so they stay in place but remain removable?
Use Velcro strips or double‑sided tape; they hold the labels securely yet allow you to replace or update them as needed.
How can I make the labels durable against wear and movement in the trunk?
Print on matte or glossy adhesive label sheets, laminate the finished labels, and ensure they are firmly secured with the chosen attachment method.