How to Install Quick‑Release Trunk Organizer Mounts in Rental Cars — Easy, No‑Drill, Removable
Introduction
One often discovers that a rental car trunk becomes a chaotic storage area after grocery trips, sports equipment loads, or emergency kit placement. This guide explains how to install quick‑release trunk organizer mounts without drilling, ensuring that the vehicle remains in pristine condition for the rental agency. Readers will learn which tools are most effective, how to secure the organizer safely, and how to remove the system without leaving marks. The result is a tidy cargo space that can be restored to factory condition in seconds.
The method described relies on friction‑based mounts, Velcro straps, and non‑slip pads that are compatible with a wide range of vehicle models. By following the steps, one can transform any rental trunk into a functional storage zone while preserving the rental agreement.
What You Will Need
- Quick‑release mounting kit (Velcro straps, non‑slip pads, and optional suction anchors)
- A sturdy, collapsible trunk organizer such as FORTEM Trunk Organizer
- A small screwdriver or flat‑head tool for adjusting strap tension
- A clean cloth for wiping the trunk surface
- Optional: a portable vacuum to remove debris before installation
Step 1: Assess the Trunk Space and Choose the Appropriate Organizer
Before any mounting occurs, one should open the trunk and evaluate the available dimensions. Measure the length, width, and depth to ensure that the selected organizer will fit without obstructing the rear seat or spare tire compartment. The FORTEM Trunk Organizer offers a 45‑liter capacity, reinforced base plates, and two large compartments, making it suitable for most midsize SUVs and trucks. Its 600D Oxford fabric provides durability while the non‑slip bottom prevents unwanted movement.
For smaller vehicles, the K KNODEL Foldable Trunk Organizer presents a compact 19.7" × 12.2" × 10.2" footprint, yet still includes two divided sections and mesh pockets. Selecting the correct size reduces the need for excessive strap tension and ensures a clean appearance.
One should also consider the typical load type. If the rental will carry groceries and occasional tools, a larger organizer such as the Sposuit 70L Trunk Organizer provides ample side pockets and reinforced handles. The decision at this stage influences the amount of mounting hardware required.
Step 2: Prepare the Trunk Surface and Attach Quick‑Release Mounts
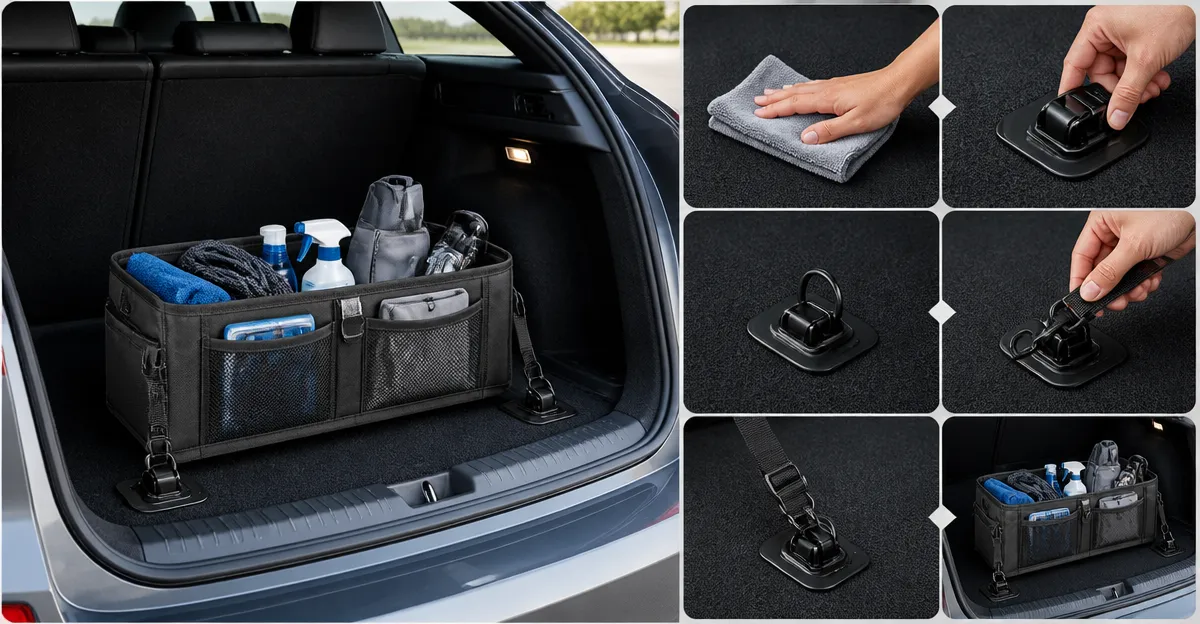
The next step involves cleaning the trunk floor and sidewalls with a damp cloth to remove dust, oil, or debris. A clean surface maximizes the adhesive strength of the non‑slip pads that accompany most quick‑release kits. After cleaning, place the non‑slip pads in the locations where the organizer’s base plates will rest. The pads create friction without permanent adhesives, allowing removal without residue.
Attach the Velcro straps to the organizer’s built‑in loops. The FORTEM Trunk Organizer includes reinforced straps with adjustable buckles, enabling one to tighten the connection to the trunk sidewalls. Wrap each strap around a side panel, pull tight, and secure the buckle. The straps act as a quick‑release mechanism; they can be undone in seconds when the rental period ends.
If the vehicle’s sidewalls lack a convenient anchor point, suction anchors may be employed. These anchors attach to smooth surfaces such as the interior of the trunk lid and release with a gentle pull. The combination of non‑slip pads, Velcro straps, and suction anchors creates a stable mounting system without any drilling.
Step 3: Position the Organizer and Verify Alignment
Place the organizer onto the prepared pads, ensuring that the base plates sit flat and the side straps are aligned with the vehicle’s sidewalls. Adjust the organizer so that the detachable lid faces upward, providing easy access to the upper compartment. The FORTEM Trunk Organizer features a removable lid that can conceal valuables, a useful feature for rental users who wish to keep personal items out of sight.
Once positioned, tighten each Velcro strap until the organizer feels secure but not distorted. The straps should compress the non‑slip pads gently, creating a friction lock that resists lateral movement during driving. Verify that the organizer does not interfere with the trunk’s closing mechanism; the lid should close fully without forcing.
For larger models such as the Sposuit 70L Trunk Organizer, additional side straps may be required. The Sposuit includes eight side cloth pockets and three mesh pockets, which can be used to anchor extra Velcro loops if the trunk sidewalls are narrow.
Step 4: Test Stability and Adjust as Needed
Before commencing the rental journey, one should perform a short test drive to assess the organizer’s stability. Accelerate gently, take a few turns, and listen for any shifting noises. If the organizer moves, loosen the straps slightly, reposition the non‑slip pads, and retighten. The goal is to achieve a firm hold that does not rely on permanent fixtures.
During the test, place a few typical items—such as a water bottle, a grocery bag, and a small tool kit—inside the compartments. Observe whether the weight distribution causes the organizer to tilt. If tilting occurs, redistribute the load or add an extra Velcro strap to the opposite side wall.
It is advisable to repeat the test after loading the trunk to full capacity. The HOTOR Trunk Organizer is designed to bear over 60 lb and includes reinforced stitching, making it a reliable option for heavier loads. Using a high‑capacity organizer reduces the need for excessive strap tension, thereby preserving the quick‑release functionality.
Step 5: Remove the System Without Leaving Marks
When the rental period concludes, the removal process should be swift and leave no trace. Begin by releasing each Velcro strap, pulling the buckle to loosen the tension. The non‑slip pads can be lifted directly from the trunk floor; they do not adhere permanently and can be stored for future use.
If suction anchors were employed, press the release button or gently pull the tab to detach them from the interior surface. The organizer can then be folded flat, thanks to its collapsible design, and placed in the vehicle’s passenger compartment for transport.
Finally, wipe the trunk surface once more to ensure that no residue remains. The rental agency will appreciate the care taken to avoid damage, and the user will retain a reusable organization system for future trips.
Tips & Pro Tips
- Choose an organizer with reinforced base plates; this feature distributes weight evenly and reduces the likelihood of bottom deformation.
- When loading heavy items, place them in the lower compartment to lower the center of gravity and improve vehicle handling.
- Use the detachable lid on the FORTEM Trunk Organizer to conceal valuables and maintain a tidy appearance.
- For long trips, consider a secondary small organizer such as the Amazon Basics Trunk Organizer to keep frequently accessed items within arm’s reach.
- Always test the stability after each major load change; sudden shifts can occur when the vehicle brakes or accelerates sharply.
Troubleshooting
Problem: Organizer slides despite tightened straps.
Solution: Replace the existing non‑slip pads with higher‑grip silicone pads. Ensure that the trunk surface is completely dry before re‑installing.
Problem: Velcro straps lose adhesion over time.
Solution: Clean the strap loops with a mild soap solution and allow them to dry fully. If wear persists, consider a reusable hook‑and‑loop system with stronger adhesive backing.
Problem: Trunk lid does not close fully.
Solution: Re‑position the organizer slightly toward the rear of the trunk, or remove one side strap to create additional clearance.
Conclusion
One now possesses a complete, no‑drill method for installing quick‑release trunk organizer mounts in rental cars. By selecting a durable organizer, employing non‑slip pads, and securing the system with adjustable Velcro straps, the user achieves a tidy cargo area that can be removed without leaving marks. The approach respects rental agreements while providing the convenience of a personalized storage solution. One is encouraged to apply these steps on the next rental journey and enjoy a clutter‑free driving experience.
Products Mentioned in This Guide
Frequently Asked Questions
Can I install quick‑release trunk organizer mounts in a rental car without drilling?
Yes, the mounts use friction pads, Velcro straps, and optional suction anchors, so no drilling is required.
What tools are included in a typical quick‑release mounting kit?
A standard kit contains Velcro straps, non‑slip friction pads, and optional suction anchors for added stability.
How do friction‑based mounts stay secure during driving?
They grip the trunk floor and sides with high‑traction pads and tensioned straps, preventing movement even on bumpy roads.
Will the mounts leave any marks or damage when removed?
No, the non‑adhesive pads and straps can be removed cleanly without leaving scratches or residue.
Are the quick‑release mounts compatible with most vehicle models?
Yes, the design fits a wide range of trunk shapes and sizes, making them suitable for most rental cars.