How to Create a Road‑Trip Emergency Kit Using Modular Organizers: A Step‑by‑Step, Space‑Saving Checklist
Introduction
Planning a long journey requires more than mapping routes and packing clothing. One must also consider safety equipment that can be accessed quickly in an emergency. This guide explains how to assemble a comprehensive road‑trip emergency kit that maximizes limited vehicle storage while providing essential tools for a variety of roadside scenarios. By the end of the article, the reader will understand how to select, arrange, and test each component, ensuring confidence and peace of mind on every mile traveled.
The approach described here leverages modular storage solutions to keep items organized, visible, and protected from damage. The guide is practical for drivers of all experience levels, and it integrates real products that have proven performance and positive customer feedback. Even readers who prefer to use existing items will find the step‑by‑step instructions valuable.
What You’ll Need
- HolaKit 55‑Piece Car Emergency Kit – $99.99
- TREKURE Jump Starter & Tire Inflator – $74.09, 4.6/5 rating
- SINSEN Safety Hammer Flashlight – $23.99, 4.6/5 rating
- C&AHOME 16‑Cube Storage Organizer – $36.46, 4.5/5 rating
- Basic tools: screwdriver, zip ties, Velcro straps
- Label maker or permanent marker
Step 1: Assess Vehicle Space and Identify Anchor Points
The first task is to evaluate the interior of the vehicle to determine where modular cubes can be securely placed. Common anchor locations include the trunk floor, under the rear seats, and the side cargo compartments. Measure the width, depth, and height of each area, noting any irregularities such as wheel wells or spare‑tire cut‑outs.
It is advisable to sketch a simple diagram that marks each potential zone. This visual aid helps to allocate cube units in a manner that distributes weight evenly, preventing the vehicle from becoming unbalanced during cornering. In addition, ensure that any safety equipment that must be reachable within seconds (for example, a safety hammer) is positioned near the driver’s seat.
When the dimensions are known, compare them to the specifications of the C&AHOME 16‑Cube Storage Organizer. Each cube measures 11.8 inches on each side, allowing the user to calculate how many cubes will fit in each compartment without obstructing seat belts or airbags.
Step 2: Gather Core Emergency Items
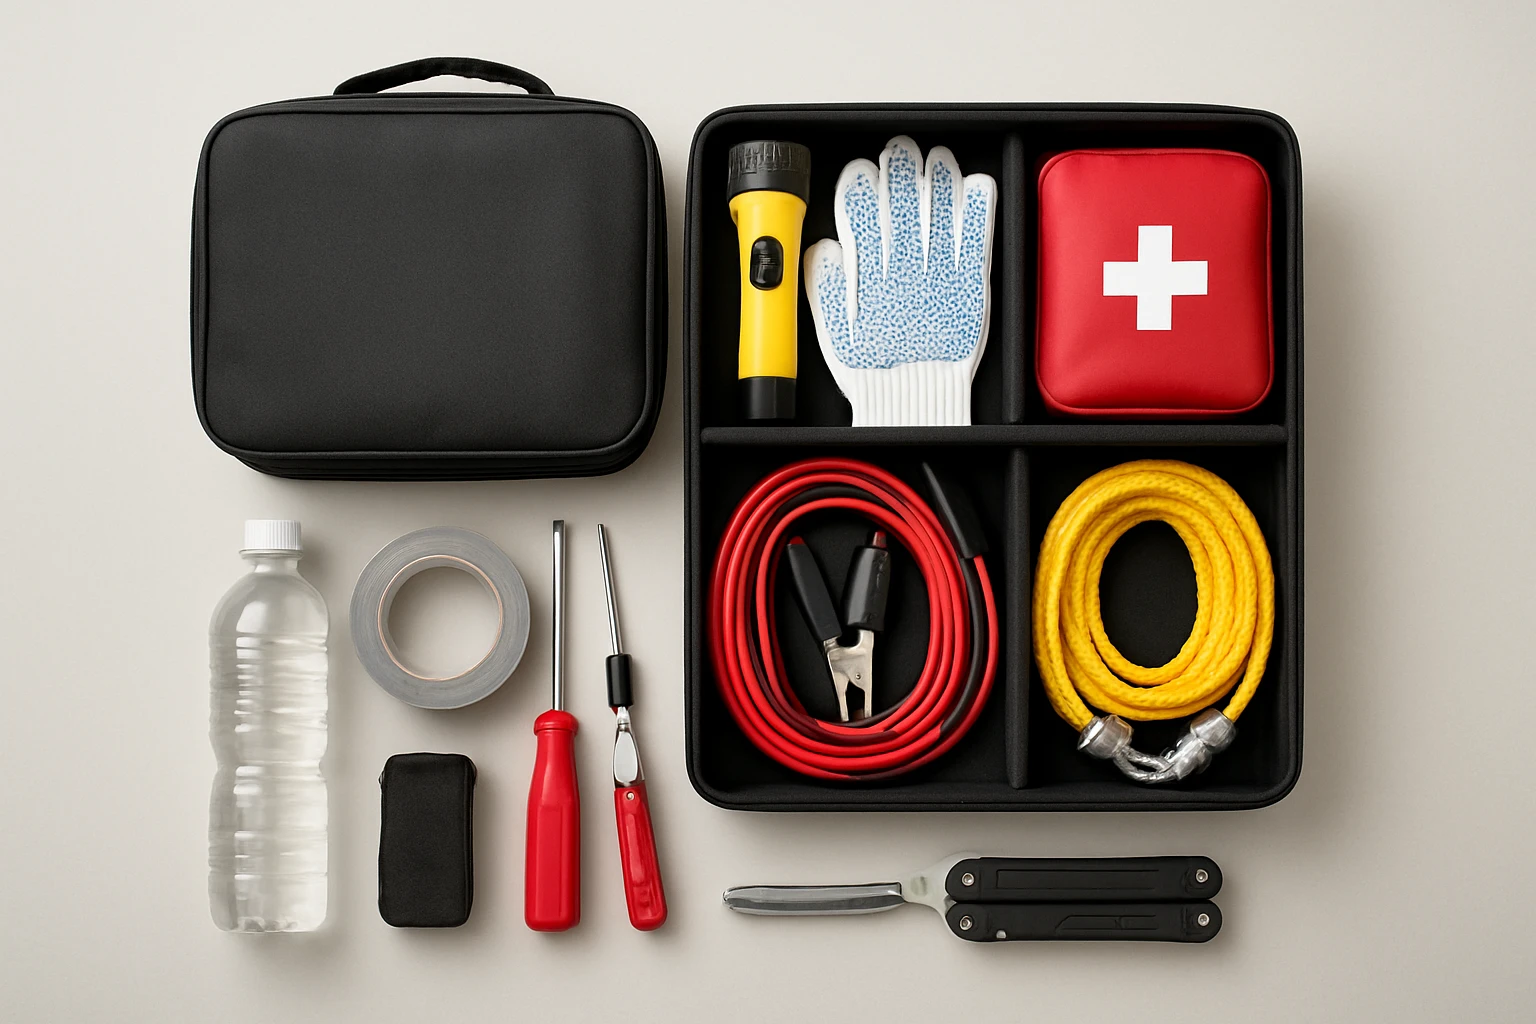
The heart of any roadside kit is a collection of tools that address the most common failures: dead batteries, flat tires, minor injuries, and vehicle escape scenarios. The HolaKit 55‑Piece Car Emergency Kit supplies a comprehensive set that includes jumper cables, tow ropes, reflective warning triangles, a hand‑free headlight, safety hammer, goggles, a reflective vest, a whistle with compass, rain poncho, emergency blanket, anti‑skid gloves, and a 40‑piece first‑aid kit.
These items are selected because they cover both mechanical and personal‑safety emergencies. The inclusion of protective goggles and gloves ensures that the user can handle high‑current jumper cables without risk of injury. The reflective vest and warning triangles improve visibility to passing traffic, reducing the chance of secondary collisions.
In addition to the HolaKit, the TREKURE Jump Starter & Tire Inflator provides an 8000‑amp peak current capable of starting gasoline engines and 14‑liter diesel engines, even in temperatures as low as –4 °F. Its built‑in 26800 mAh power bank also supplies 18 W USB output for charging smartphones, a valuable feature during prolonged outages.
Finally, the SINSEN Safety Hammer Flashlight adds a dedicated window‑breaker, seat‑belt cutter, multi‑mode LED illumination, and solar charging capability. This tool is essential for rapid vehicle egress when doors are jammed or windows are shattered.
Step 3: Organize Items Within the Modular Cubes
After gathering the core tools, the next step is to allocate them into the C&AHOME 16‑Cube Storage Organizer. Begin by grouping items by function: electrical, mechanical, first‑aid, and personal‑protection. Place the jumper cables, safety hammer, and headlight in one cube labeled "Electrical & Light". Store the tow ropes, reflective triangles, and whistle in a second cube titled "Signaling & Recovery".
Reserve a dedicated cube for the first‑aid supplies, ensuring that bandages, antiseptic wipes, and trauma shears are easily visible. The SINSEN flashlight can be placed in a cube near the driver’s side so that it can be retrieved without reaching into the trunk. The TREKURE unit, due to its bulk, should occupy a lower‑center cube to maintain a low center of gravity and prevent shifting during sudden stops.
Secure each cube with Velcro straps or zip ties to the vehicle’s anchor points. The C&AHOME system includes metal connectors that lock together, providing a sturdy frame that resists vibration. Use a label maker to mark each cube on the front face; clear labeling reduces search time when an emergency occurs.
Step 4: Integrate Power Solutions and Redundancy
Modern emergencies often involve electronic devices such as smartphones, GPS units, or portable radios. The TREKURE’s 26800 mAh battery offers sufficient capacity to recharge multiple devices, but it is prudent to include a secondary power source. The SINSEN flashlight features a solar panel and USB input, allowing it to function as an auxiliary power bank.
Connect the TREKURE’s dual output ports to a short‑length power strip that can be stored in a separate cube. This arrangement enables simultaneous charging of a phone and a navigation tablet. Keep a spare USB‑C cable in the same cube to accommodate newer devices.
Test the charging capability before the trip by fully charging the TREKURE and SINSEN units, then running a simulated charge cycle for at least 30 minutes. Verify that the LED indicators display correct voltage levels. This verification prevents unexpected battery depletion when the kit is needed most.
Step 5: Final Placement, Accessibility Check, and Routine Maintenance
With all cubes assembled, place the entire organizer in the pre‑identified vehicle compartment. Ensure that the configuration does not block the rear‑view camera, seat‑belt latch, or trunk release lever. Conduct a mock emergency drill: simulate a flat tire, retrieve the TREKURE inflator, and inflate a spare tire to confirm that the hose and nozzle function correctly.
Perform a second drill focusing on personal safety: use the SINSEN safety hammer to break a window (a training pane is recommended) and cut a seat belt. This practice builds muscle memory, reducing hesitation in a real crisis.
Establish a maintenance schedule, such as a quarterly inspection. Check expiration dates on first‑aid supplies, verify that the battery charge of both the TREKURE and SINSEN remains above 80 %, and ensure that all straps and connectors are tight. Replace any worn components promptly to preserve the kit’s reliability.
Tips & Pro Tips
- Store a compact rain poncho from the HolaKit in the driver’s side pocket for immediate use during sudden downpours.
- Use the reflective safety vest as a high‑visibility marker when changing a tire on a busy highway.
- Keep a spare set of jumper cable clamps in the vehicle’s glove compartment as a backup.
- When assembling the C&AHOME cubes, alternate the orientation of each unit to create a staggered pattern that improves structural rigidity.
- Consider adding a small fire extinguisher (Class B) to a dedicated cube if the vehicle frequently transports combustible materials.
Troubleshooting
| Problem | Possible Cause | Solution |
|---|---|---|
| Jump starter fails to start engine | Battery charge below 20% | Recharge the TREKURE using a wall adapter; verify LED indicator shows full charge before next use. |
| Inflator does not shut off automatically | Pressure sensor malfunction | Manually monitor pressure with a gauge; replace the inflator if the issue persists after firmware update. |
| Flashlight dim after multiple uses | Solar panel not receiving sufficient sunlight | Charge via USB cable; ensure solar surface is clean of dust and debris. |
| Cubes shift during sudden stop | Loose Velcro straps | Re‑tighten straps and add additional zip ties for reinforcement. |
Conclusion
By following the structured approach outlined in this guide, the reader can create a road‑trip emergency kit that is both comprehensive and space‑efficient. The combination of the HolaKit 55‑Piece Car Emergency Kit, TREKURE Jump Starter & Tire Inflator, SINSEN Safety Hammer Flashlight, and C&AHOME 16‑Cube Storage Organizer provides coverage for electrical failures, tire issues, personal safety, and organized storage. Regular maintenance and practiced drills ensure that the kit remains ready for any unforeseen circumstance, granting the driver confidence and safety on every journey.
Products Mentioned in This Guide
Frequently Asked Questions
What are the key benefits of using modular organizers for a road‑trip emergency kit?
Modular organizers keep items visible, protect them from damage, and maximize limited vehicle storage by allowing customized compartments.
Which essential items should be included in a basic road‑trip emergency kit?
A basic kit should contain a first‑aid kit, flashlight, multi‑tool, jumper cables, tire repair supplies, and a high‑visibility safety vest.
How do I choose the right size modular organizer for my vehicle?
Measure the available storage space, then select an organizer that fits snugly while offering enough compartments for all essential items.
What is the best way to test the emergency kit before hitting the road?
Conduct a quick walk‑through to ensure each item is accessible, check battery levels on electronic tools, and verify that all supplies are within expiration dates.
Can I use existing containers instead of buying a new modular organizer?
Yes, repurpose sturdy containers with dividers, but ensure they secure items during travel and remain easy to reach in an emergency.