How to Create a Car Trunk Pantry: Ultimate Step-by-Step Guide to Organizing, Stocking, and Emergency Essentials for Road Trips
Introduction
The modern traveler values both convenience and safety when embarking on a long journey. This guide explains how to convert a vehicle trunk into a functional pantry that stores food, beverages, and emergency supplies in an orderly fashion. Readers will learn how to assess space, select appropriate containers, and integrate essential tools that protect both occupants and cargo. By following the instructions, one can enjoy a clutter‑free trunk, quicker access to necessities, and peace of mind during unexpected situations.
Organizing a trunk pantry reduces the time spent searching for items, prevents items from shifting during sudden stops, and maintains a hygienic environment for perishable goods. The process also highlights the importance of preparing for emergencies, a practice that seasoned travelers recommend. Throughout the guide, specific products are suggested where they add measurable value, yet the steps remain effective without any purchase.
What You Will Need
- Durable, waterproof storage organizer (first mention below)
- Compact emergency kit (first mention below)
- Reusable food containers, zip‑lock bags, and insulated cooler bag
- Non‑slip mat or Velcro straps for stability
- Cleaning wipes and a small handheld vacuum
- Label maker or waterproof markers for clear identification
Step 1: Assess Your Trunk Space and Define Zones
Begin by emptying the trunk completely and measuring the length, width, and height of the usable area. Record these dimensions in centimeters to ensure that all selected containers will fit without obstructing the rear seats or the spare tire. Next, sketch a simple floor plan on paper, dividing the space into three zones: food storage, beverage storage, and emergency supplies. This visual layout helps to allocate each zone a dedicated area, preventing overlap and making retrieval intuitive.
When defining zones, consider the frequency of use. Items needed daily, such as water bottles, should be placed within easy reach, while rarely used emergency tools can occupy the rear corner. The plan also reveals whether a vertical stacking solution is required to maximize height.
Step 2: Install a Non‑Slip Base Using the Oasser Car Trunk Organizer
To keep items from sliding during acceleration or sudden braking, place the Oasser Car Trunk Organizer on the floor of the trunk. This organizer is constructed from 600 D waterproof Oxford cloth and a reinforced base plate that can support up to 77 lb, making it suitable for heavy grocery bags and canned goods. Its non‑slip bottom employs hook‑and‑loop fasteners that adhere to carpeted or rubberized surfaces, providing stability without permanent modifications.
The organizer features three main compartments, two removable dividers, and four mesh side pockets, allowing flexible arrangement of food containers, snack boxes, and small tools. The foldable cover protects items from dust and sunlight, preserving freshness for longer periods. Priced at $19.99 with a 4.7‑star rating from 13,599 reviews, it offers a cost‑effective solution for both organization and protection.
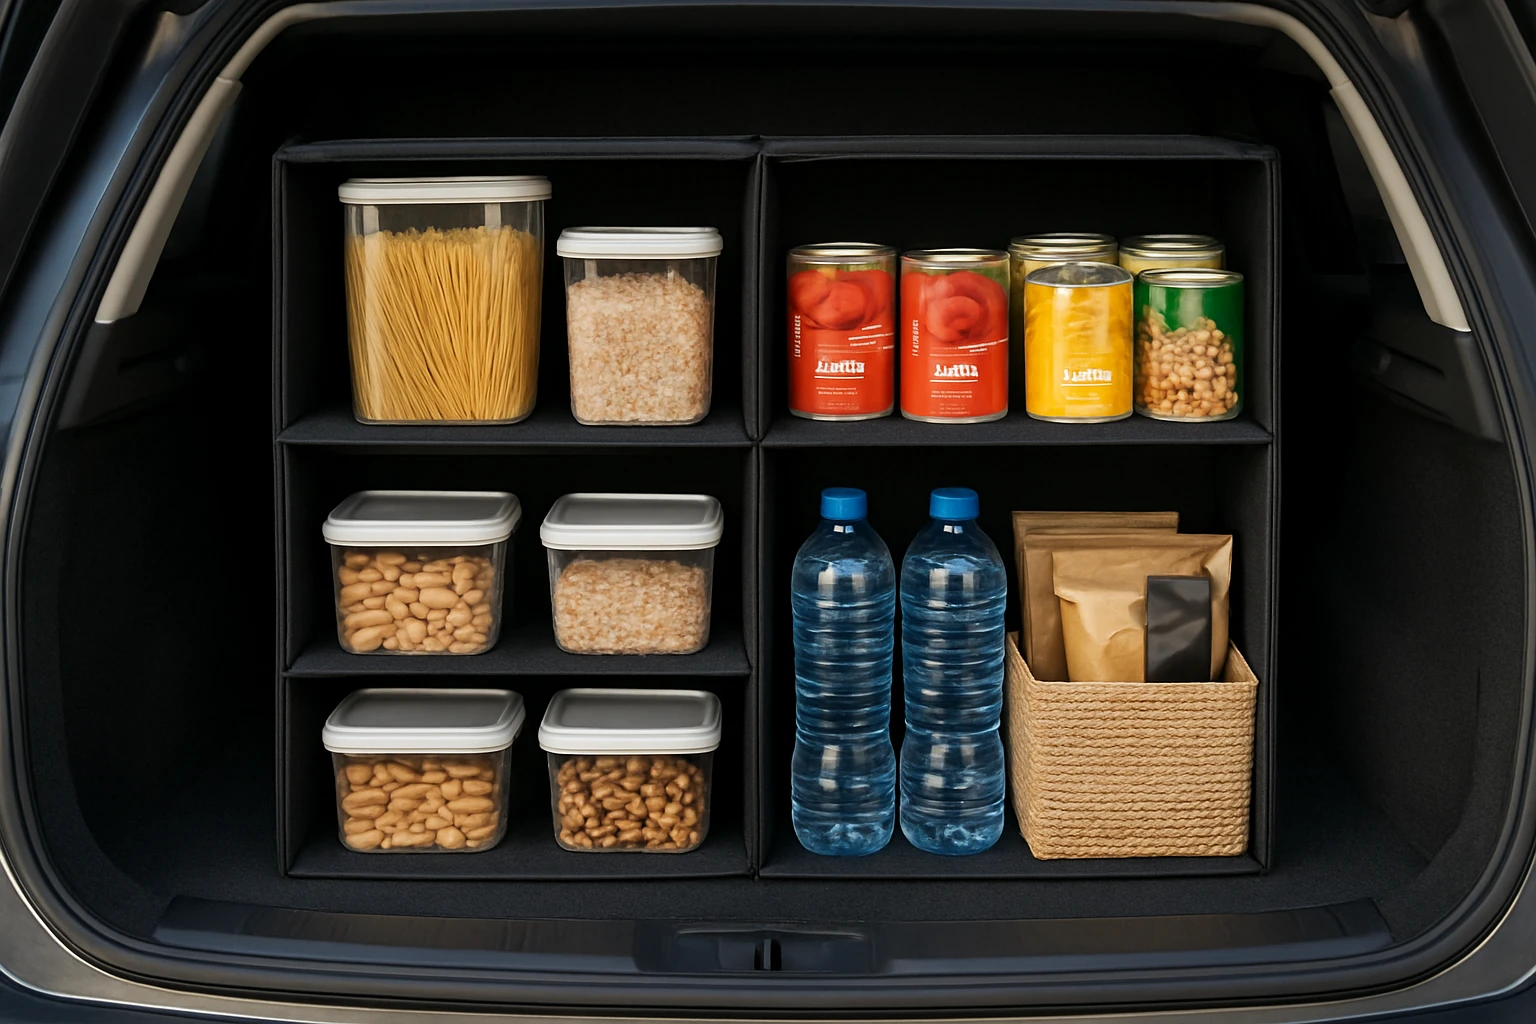
Step 3: Allocate the Food Storage Zone
Place reusable food containers inside the largest compartment of the organizer. Use airtight containers for dry goods such as pasta, rice, and granola bars, and insulated cooler bags for perishable items like cheese and fruit. Arrange containers so that the heaviest items are positioned at the bottom, creating a low center of gravity that reduces movement.
Label each container with a waterproof marker to indicate contents and expiration dates. This practice prevents accidental consumption of expired foods and assists in quick inventory checks before each trip.
Step 4: Set Up the Beverage Storage Zone
Reserve the second compartment for bottled water, sports drinks, and coffee thermoses. Insert a small, reusable water dispenser or a collapsible water jug that fits snugly against the side wall of the trunk. This arrangement keeps beverages upright and prevents spills that could damage electronics or upholstery.
If the vehicle is equipped with a built‑in cup holder in the rear, align the beverage zone so that the nearest bottles are within arm’s reach for the driver and passengers. This small convenience improves comfort on long journeys.
Step 5: Create an Emergency Supplies Zone Using the Wanderblooms Car Emergency Kit
Place the Wanderblooms Car Emergency Kit in the rear corner of the trunk, away from food items to avoid contamination. The kit includes a 150 PSI portable air compressor, 8.2‑foot copper‑clad jump cables rated at 500 AMP, a folding multi‑tool shovel, a 10,000‑lb tow rope, a first‑aid kit, an emergency blanket, a reflective safety vest, and a glass‑breaker seatbelt cutter.
At $69.95 with a 4.3‑star rating from 138 reviews, the kit consolidates essential tools that would otherwise require multiple separate purchases. Its compact bag fits neatly within the organizer’s side pocket, yet remains easily accessible for rapid deployment during a roadside incident.
Step 6: Secure the Organizer and Emergency Kit
After positioning the organizer and emergency kit, engage the hook‑and‑loop fasteners on the organizer’s base to lock it to the trunk floor. If the trunk surface is smooth, add a non‑slip mat beneath the organizer for extra grip. For the emergency kit, use the built‑in straps or Velcro loops on the kit’s bag to attach it to the organizer’s side pocket, ensuring it does not shift during travel.
Check that all fasteners are firmly engaged before closing the trunk. A quick tug test confirms stability and prevents unexpected movement that could cause damage.
Step 7: Populate the Pantry with Snacks and Essentials
Fill the food compartment with a balanced selection of snacks that provide sustained energy, such as mixed nuts, dried fruit, protein bars, and whole‑grain crackers. Include a small, resealable bag of electrolytes or powdered drink mix for hydration during hot weather.
Arrange items so that the most frequently consumed snacks are at the front of the compartment, reducing the need to dig through the organizer. This arrangement saves time during rest stops and minimizes the risk of spills.
Step 8: Add Cleaning Supplies for Maintenance
Store a pack of disinfecting wipes, a microfiber cloth, and a compact handheld vacuum in the third compartment or a side pocket of the organizer. These tools enable quick removal of crumbs, dust, and pet hair, preserving a clean environment for food storage.
Schedule a brief cleaning session after each trip to empty trash, wipe surfaces, and inspect the organizer for wear. Regular maintenance extends the lifespan of both the organizer and the pantry contents.
Step 9: Test Accessibility and Adjust Layout
Before embarking on a road trip, close the trunk and simulate a quick retrieval of each item. Verify that the organizer opens smoothly, the emergency kit can be removed with one hand, and beverages remain upright. If any item is difficult to reach, rearrange the compartments or adjust the divider positions.
Perform this test in both seated and standing positions to ensure that passengers of varying heights can access the pantry without strain.
Step 10: Document Inventory and Update Regularly
Maintain a simple inventory list on a smartphone note or a printed sheet placed inside the organizer. Record each item’s quantity, expiration date, and location within the pantry. Update the list after each trip to reflect consumed or replenished items.
Regular inventory checks prevent over‑stocking, reduce waste, and ensure that emergency supplies remain within their service life.
Tips & Pro Tips
- Use insulated cooler bags with reflective exterior to keep perishable foods cold without an external power source.
- Wrap glass bottles in a small towel before placing them in the organizer to prevent breakage.
- Consider a magnetic strip on the side of the organizer to hold metal tools such as a small flashlight or multi‑tool.
- Rotate stock every three months to keep food fresh and emergency supplies functional.
Troubleshooting
Problem: Organizer slides despite hook‑and‑loop fasteners.
Solution: Clean the trunk floor and the fastener surface with a dry cloth, then re‑apply the fasteners. If sliding persists, place a thin rubber mat beneath the organizer for additional friction.
Problem: Emergency kit is difficult to open quickly.
Solution: Practice opening the kit in a stationary position. Replace the bag’s strap with a larger Velcro loop if the original fastener is worn.
Conclusion
Creating a car trunk pantry transforms a chaotic cargo area into an organized, efficient hub for food, beverages, and emergency tools. By assessing space, installing a sturdy organizer, and strategically placing the Wanderblooms Car Emergency Kit, one achieves both convenience and safety on any road trip. Regular maintenance, inventory updates, and thoughtful placement of items ensure that the pantry remains functional for years to come. Readers are encouraged to implement these steps and enjoy the benefits of a well‑prepared vehicle.
Products Mentioned in This Guide
Frequently Asked Questions
What is the best type of container for a car trunk pantry?
Use durable, waterproof storage organizers with sealed lids to protect food from spills and temperature changes.
How much space should I allocate for emergency supplies in my trunk pantry?
Reserve at least 10-15% of trunk volume for a basic emergency kit, including first‑aid items, blankets, and a flashlight.
Can perishable foods be safely stored in a trunk pantry?
Yes, if you use insulated cooler bags and keep them in a shaded, ventilated area, perishable items can stay fresh for short trips.
What tools help prevent items from shifting during sudden stops?
Install non‑slip mats, tie‑down straps, or cargo nets to secure containers and keep them stable while driving.
How often should I restock and reorganize my trunk pantry?
Review and replenish supplies after each long trip, checking expiration dates and replacing worn containers as needed.