How to Choose, Install, and Organize Trunk Organizers for Your RV Slide‑Out Garage
Introduction
When traveling in a recreational vehicle, the slide‑out garage often becomes a repository for tools, spare tires, and outdoor gear. An efficiently organized garage not only protects valuable items but also improves safety while the vehicle is in motion. This guide explains how to evaluate storage needs, install a versatile pull‑out organizer, and arrange belongings for optimal accessibility. By following these instructions, one can transform a cramped, hard‑to‑reach space into a functional storage hub without extensive modifications.
The focus of this guide is on a specific solution—the Fokyfok Pull‑Out Cabinet Organizer—which offers adjustable dimensions, adhesive installation, and robust load‑bearing rails. The principles described, however, apply to any comparable system, allowing readers to make informed choices even if they prefer alternative products.
What You’ll Need
- Measuring tape or laser measurer to verify interior dimensions of the slide‑out garage.
- Cleaning supplies (isopropyl alcohol, lint‑free cloth) to prepare surfaces for adhesive attachment.
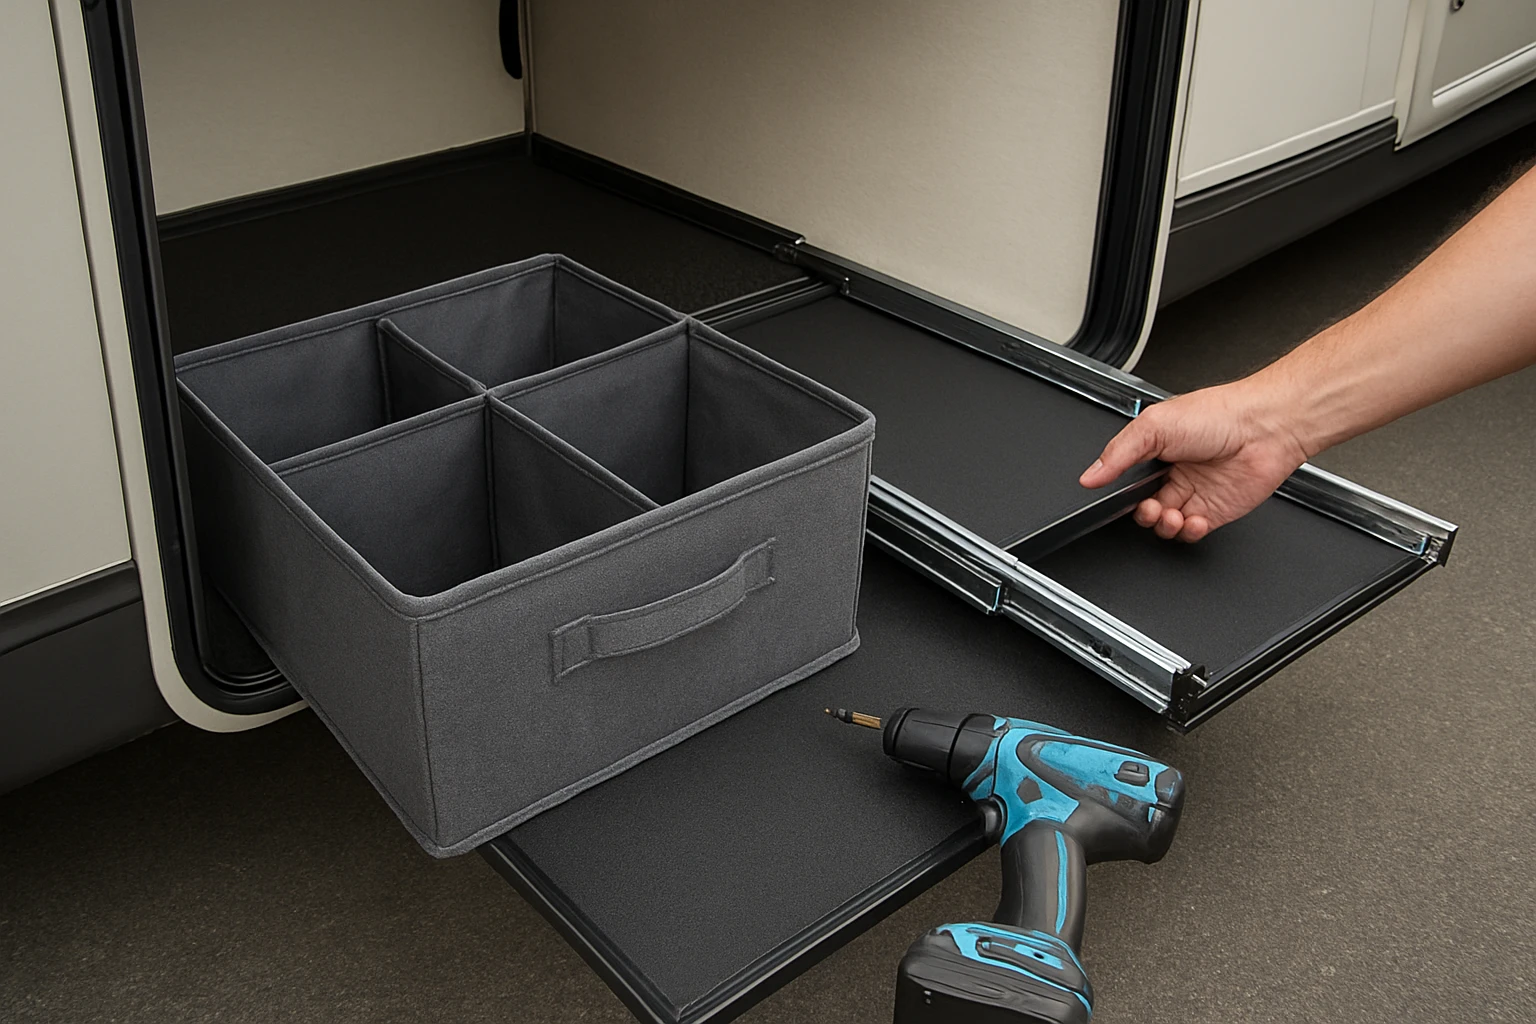
- Fokyfok Pull‑Out Cabinet Organizer – adjustable, no‑drill organizer.
- Level and pencil for marking placement of the guide rails.
- Optional: Silicone‑based sealant to reinforce adhesion in high‑humidity environments.
Step 1 – Assess Your Storage Requirements
Begin by cataloguing the items you intend to store in the garage. Group objects by size, weight, and frequency of use. Heavy items such as a spare tire or jerry‑can should occupy the lower portion of the organizer, while lighter accessories like camping cookware belong on higher shelves. This classification informs the width and depth settings of the pull‑out system.
Measure the interior width and depth of the slide‑out compartment. The Fokyfok Pull‑Out Cabinet Organizer accommodates widths from 14 to 21 inches and depths from 17 to 24 inches, making it suitable for most RV garages. Record both dimensions; they will determine the final extension of the organizer.
Confirm that the garage lacks a lip at the front edge. The product description explicitly states it is not compatible with cabinets that have a lip. If a lip exists, consider the brand’s alternative models designed for lip‑equipped cabinets.
Step 2 – Prepare the Surface for Adhesive Installation
Proper surface preparation is essential for the nano‑adhesive to achieve its rated holding strength. Clean the interior walls of the garage with isopropyl alcohol to remove dust, grease, or residual adhesives from previous installations. Allow the surface to dry completely before proceeding.
Inspect the area for unevenness. Minor imperfections can be smoothed with a fine‑grade sandpaper, followed by another wipe‑down. A smooth, clean surface ensures that the adhesive on the organizer’s rails bonds securely, eliminating the need for drilling or screws.
For environments with high moisture, apply a thin bead of silicone sealant along the rail edges after placement. This step is optional but adds an extra barrier against delamination.
Step 3 – Configure the Organizer’s Dimensions
Unpack the organizer and locate the three guide rails. The rails are designed to slide into one another, allowing the drawer to expand or contract lengthwise. Adjust the rails to match the measured width of your garage, ensuring the outermost rail aligns with the opposite wall.
Next, set the depth. The organizer features telescoping side panels that lock into place with a gentle push. Align the panels with the measured depth, making sure the back panel sits flush against the rear wall of the garage. The adjustable nature of the system maximizes usable space without sacrificing stability.
When the dimensions are set, verify that the drawer slides smoothly along the rails. If resistance is felt, check for misaligned rails or debris on the sliding surface.
Step 4 – Install the Guide Rails Using Adhesive
Peel the protective film from the adhesive side of each rail. Position the first rail at the lower back corner of the garage, pressing firmly for at least 30 seconds. Use a level to confirm that the rail is perfectly horizontal; an uneven rail will cause the drawer to bind during operation.
Repeat the process for the remaining two rails, ensuring equal spacing between them. The three‑rail configuration, as highlighted in the product’s specifications, provides superior load‑bearing capacity compared with single‑rail alternatives. This design distributes weight evenly, allowing the organizer to support heavy tools without sagging.
After all rails are affixed, allow the adhesive to cure for the manufacturer‑recommended 24‑hour period before loading the organizer. This waiting period guarantees maximum holding strength.
Step 5 – Populate the Organizer Strategically
Begin by placing the heaviest items at the bottom drawer compartment. The sturdy three‑track rail system can comfortably bear loads exceeding 30 kg, making it ideal for spare tires, fire extinguishers, and bulk batteries. Secure these items with non‑slip liners to prevent movement during travel.
Allocate the middle tier for medium‑weight gear such as camping chairs, toolboxes, and portable grills. Use removable dividers—available as optional accessories from the same brand—to create separate sections and avoid clutter.
Reserve the uppermost drawer for lightweight, frequently accessed items like maps, first‑aid kits, and charging cables. Because the drawer slides out fully, one can retrieve these items without removing heavier objects from the lower levels.
Tips & Pro Tips
- Measure twice, install once: Accurate measurements prevent the need for readjustment after adhesive cure.
- Weight distribution: Keep the center of gravity low to maintain vehicle stability, especially when driving on uneven terrain.
- Regular inspection: Check the adhesive bond annually; re‑apply adhesive strips if any rail shows signs of loosening.
- Use labels: Attach waterproof labels to each drawer compartment to quickly locate items during a road trip.
- Alternative mounting: If the garage surface is painted or glossy, lightly sand the area before applying the adhesive to improve grip.
Troubleshooting
Problem: Drawer does not slide smoothly.
Solution: Remove the drawer and inspect the rails for dust or misalignment. Clean the rails with a dry cloth and re‑insert the drawer, ensuring the rails are parallel.
Problem: Rail detaches after heavy loading.
Solution: Verify that the adhesive was applied to a clean, dry surface. If the bond fails, re‑attach the rail using a fresh adhesive strip and allow the full cure time before reloading.
Conclusion
By assessing storage needs, preparing the garage surface, configuring dimensions, and installing the Fokyfok Pull‑Out Cabinet Organizer, one can transform an under‑utilized RV slide‑out garage into a highly accessible storage zone. The adjustable, no‑drill design eliminates the need for permanent modifications while providing robust support for heavy equipment. Implementing the organizational strategies outlined in this guide will enhance safety, reduce clutter, and improve the overall travel experience.
Products Mentioned in This Guide
Frequently Asked Questions
What factors should I consider when choosing a trunk organizer for my RV slide‑out garage?
Measure the available space, weight capacity, and mounting method, and look for adjustable dimensions and durable materials that suit your gear.
Can the Fokyfok Pull‑Out Cabinet Organizer be installed without drilling?
Yes, it uses strong adhesive pads and optional screws, allowing a no‑drill installation for most RV interiors.
How do I ensure the organizer’s rails can support heavy items like spare tires?
Check the rail’s load rating, secure them to reinforced studs or brackets, and distribute weight evenly across the shelf.
What is the best way to arrange tools and outdoor gear for easy access?
Place frequently used items in the front pull‑out tray, heavier equipment on lower shelves, and use labeled bins or hooks for smaller parts.
Will installing a pull‑out organizer affect the slide‑out mechanism?
If installed correctly with proper clearances, the organizer won’t interfere with the slide‑out’s movement, but always test the slide after mounting.