Introduction
In this guide, one will discover how to convert a vehicle trunk into a fully functional mobile podcasting studio. The process combines practical organization techniques with carefully chosen audio equipment. By following each step, a content creator can record high‑quality audio while traveling, without the need for a permanent recording room. The result is a versatile solution that saves time, reduces studio costs, and expands the reach of any podcasting venture.
What You’ll Need
- A sturdy trunk organizer or custom‑fit storage box.
- Power source (car charger or portable battery).
- Audio interface and microphones (see product recommendations below).
- Cable management accessories such as Velcro straps and zip ties.
- Headphones for monitoring.
- Optional: a reference guide such as Podcasting for Beginners.
Step 1: Design the Layout of Your Trunk Studio
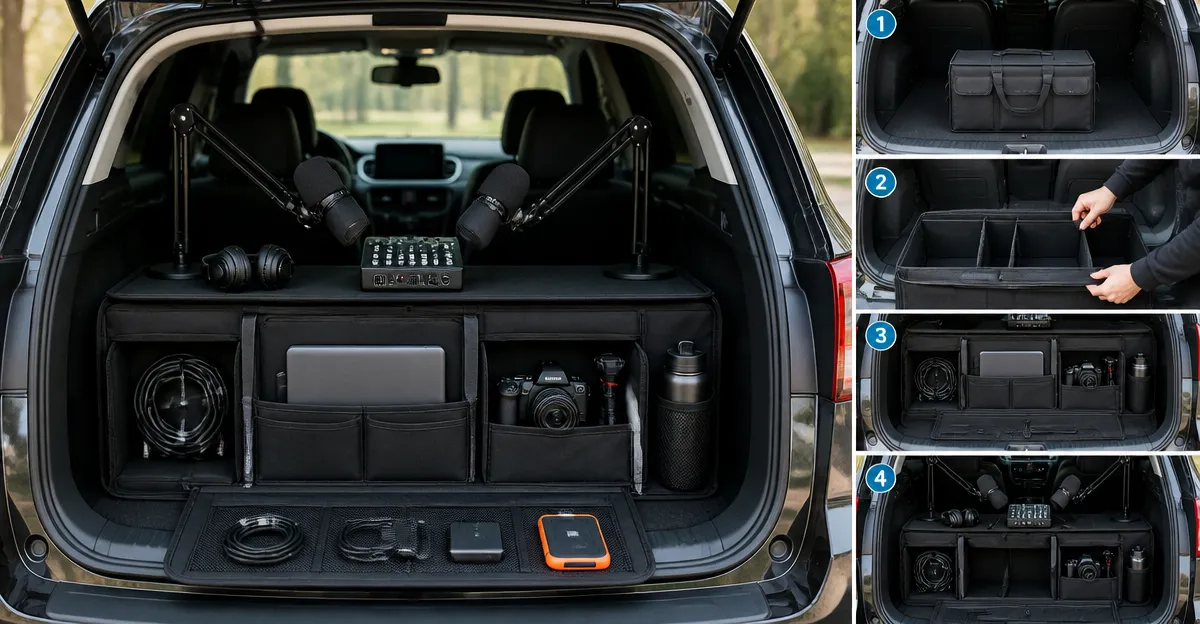
The first major step is to sketch a layout that maximizes space while keeping essential gear within easy reach. Measure the dimensions of the trunk and choose a organizer that fits snugly, preventing movement during travel. Allocate separate compartments for the audio interface, microphones, headphones, and cable reels. By visualizing the flow of equipment, one can avoid clutter and ensure a stable recording environment.
Step 2: Install a Reliable Power Solution
Consistent power is critical for any mobile recording setup. A 12 V car charger with multiple USB‑C ports can supply the Movo Portable Podcast Equipment Bundle and any additional accessories. Choose a charger that offers at least 2.4 A per port to sustain the dual‑channel MDX‑2 interface during long sessions. Secure the charger to the trunk wall with a non‑slip pad so that cables remain organized and do not interfere with the vehicle’s operation.
Step 3: Choose and Install the Audio Interface
The audio interface acts as the bridge between microphones and the recording device. For creators who need two microphones and on‑the‑go flexibility, the Movo Portable Podcast Equipment Bundle includes the MDX‑2 dual USB interface, two CastMic XLR microphones, and a travel case. Its battery‑powered design provides up to eight hours of operation, and it connects via USB‑A, USB‑C, or Lightning cables, making it compatible with smartphones, tablets, and laptops. The MDX‑2 features two XLR inputs with 48 V phantom power, two headphone outputs, and stereo 1/4" outputs, ensuring professional‑grade signal routing.
For users who prefer a desktop‑class converter, the Focusrite Scarlett 2i2 offers 24‑bit/192 kHz resolution and a dynamic range of 120 dB. Its two ultra‑low‑noise preamps and auto‑gain function simplify level setting, while the included software bundle adds value for post‑production. The Scarlett 2i2 requires a stable USB connection to a laptop, making it ideal for longer road trips where a laptop is already present.
Advanced creators may opt for the RØDECaster Pro II, an all‑in‑one production console that integrates four combo inputs, built‑in APHEX processing, and dual USB‑C interfaces. Although priced at $529.00, the Pro II eliminates the need for separate mixers and software, providing a turnkey solution for multi‑host shows or live streaming directly from the vehicle.
Step 4: Set Up Microphones and Stands
Microphones capture the voice, and their placement determines clarity and background‑noise rejection. The CastMic XLR microphones included in the Movo bundle feature a cardioid pattern and a frequency response of 40 Hz–16 kHz, which reduces room ambience and focuses on the speaker. Mount each mic on the compact tabletop stands that accompany the bundle; the stands fit comfortably within a trunk organizer without tipping over.
For a budget‑friendly alternative, the FIFINE K688 Podcast Microphone Kit provides both USB and XLR connectivity, a boom arm, and a gain knob. Its dynamic capsule delivers up to 130 dB SPL, making it suitable for loud environments. The built‑in mute button and headphone monitoring jack enable quick adjustments without software, which is valuable when recording from a moving vehicle.
Position each microphone 2–6 inches from the speaker’s mouth, aiming the capsule slightly upward to capture the full tonal range while minimizing plosives. Use the included shock mount and windscreen to further suppress vibrations caused by road noise.
Step 5: Organize Cables and Accessories
Proper cable management prevents tangles, reduces wear, and maintains a tidy workspace. Route all XLR and USB cables through Velcro‑wrapped sleeves, securing them to the trunk organizer walls with zip ties. Label each cable with a small tag to identify the microphone, interface, or power line at a glance.
Place the headphones in a dedicated pocket to protect the ear cups and ensure quick access for monitoring. If you are using the Movo bundle, store the included travel case in the same compartment as the MDX‑2 interface; this keeps the unit protected from dust and impacts.
Finally, allocate a small compartment for the user manual of each device and the Podcasting for Beginners ebook, which can be consulted for on‑the‑fly troubleshooting.
Step 6: Test the System and Record a Sample Episode
Before embarking on a full recording session, perform a comprehensive test. Connect the audio interface to a laptop or smartphone, launch your preferred recording software, and verify that each microphone appears as a separate input channel. Adjust the gain knobs on the interface or the FIFINE K688 (if using XLR) until the input meters show peaks around -12 dB, leaving headroom for unexpected loud moments.
Record a short test segment of 30 seconds, then listen back through the headphones to assess clarity, background noise, and latency. If the MDX‑2 battery is low, replace it with a fresh charge to avoid dropouts during longer sessions. Make any necessary adjustments to microphone positioning or gain settings, then lock the trunk organizer in place to prevent movement while driving.
Tips & Pro Tips
- Use a high‑capacity power bank (20,000 mAh or greater) as a backup for the MDX‑2 interface on long trips.
- Apply acoustic foam panels to the trunk walls to dampen road vibrations and echo.
- When recording with multiple hosts, assign each microphone to a separate channel on the RØDECaster Pro II for independent post‑production control.
- Keep a spare set of XLR cables in the organizer; cables are prone to wear from frequent plugging and unplugging.
- Schedule regular firmware updates for the audio interface to maintain compatibility with new operating systems.
Troubleshooting
No audio signal: Verify that the microphone is powered (phantom power enabled on the MDX‑2 or Scarlett) and that the XLR cable is fully seated. Check the USB connection on the recording device and ensure that the correct input source is selected in the software.
Excessive background noise: Move the microphone farther from the car’s ventilation system and use the cardioid pattern to reject side noise. Adding a small windscreen or foam cover can also reduce wind‑related hiss.
Latency or dropouts: Reduce the buffer size in the recording software to improve responsiveness, but ensure the computer can handle the lower setting. If the issue persists, switch to a direct USB connection instead of a USB hub.
Conclusion
By following the steps outlined above, one can transform a vehicle trunk into a reliable, high‑quality mobile podcasting studio. The combination of a well‑planned layout, a stable power source, and carefully selected gear such as the Movo Portable Podcast Equipment Bundle, Focusrite Scarlett 2i2, RØDECaster Pro II, and FIFINE K688 ensures professional results on the road. With practice, the mobile studio will become an extension of the creator’s workflow, enabling spontaneous interviews, on‑location storytelling, and uninterrupted content production wherever the journey leads.
Products Mentioned in This Guide
Frequently Asked Questions
What equipment is essential for a mobile podcasting trunk studio?
You need a sturdy trunk organizer, a power source, an audio interface with microphones, cable-management tools, and headphones for monitoring.
How can I power my podcasting gear while on the road?
Use a car charger plugged into the cigarette lighter or a high‑capacity portable battery with DC output to run your interface and mics.
What’s the best way to organize cables in a trunk studio?
Secure cables with Velcro straps or zip ties and route them through designated channels in the organizer to prevent tangles.
Can I record high‑quality audio in a vehicle without soundproofing?
Yes, by positioning the microphones close to the speaker, using directional mics, and adding portable acoustic panels or foam to reduce echo.
How do I design the layout of my trunk studio for easy access?
Sketch the trunk dimensions, place the audio interface and mic stand within arm’s reach, and store larger items at the back to keep the workspace clear.